...

Island Peak Trek- 16 Days

Island Peak Trek- 16 Days

  • (9 Reviews)

Facts

Group Size: 1-12 people
Min. Age: 16
Grade:Strenuous

Accomodation

Group Size: 1-12 people
Min. Age: 16
Grade:Strenuous

Meals

Group Size: 1-12 people
Min. Age: 16
Grade:Strenuous

Trip Introduction

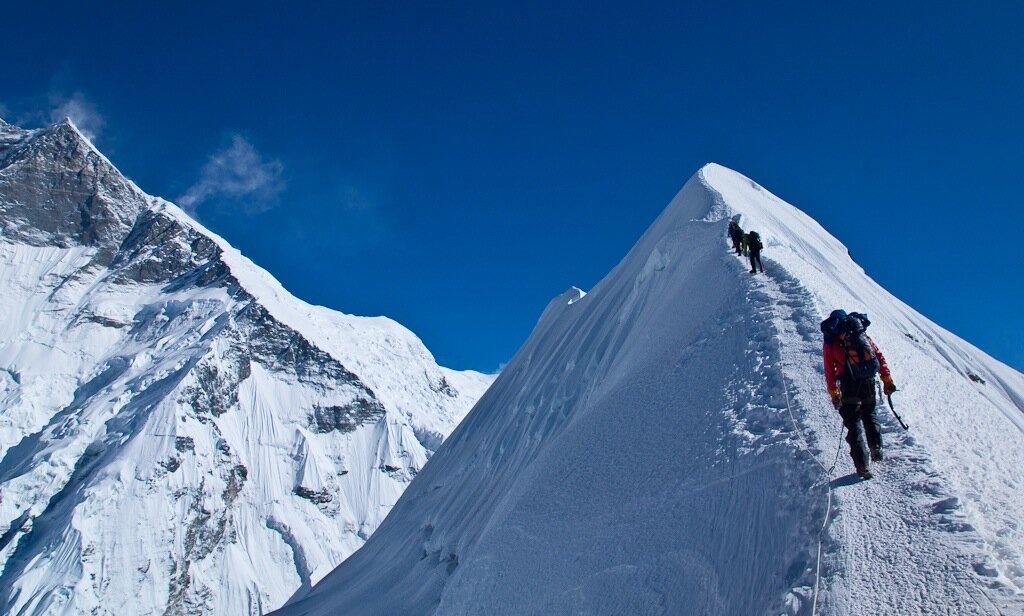
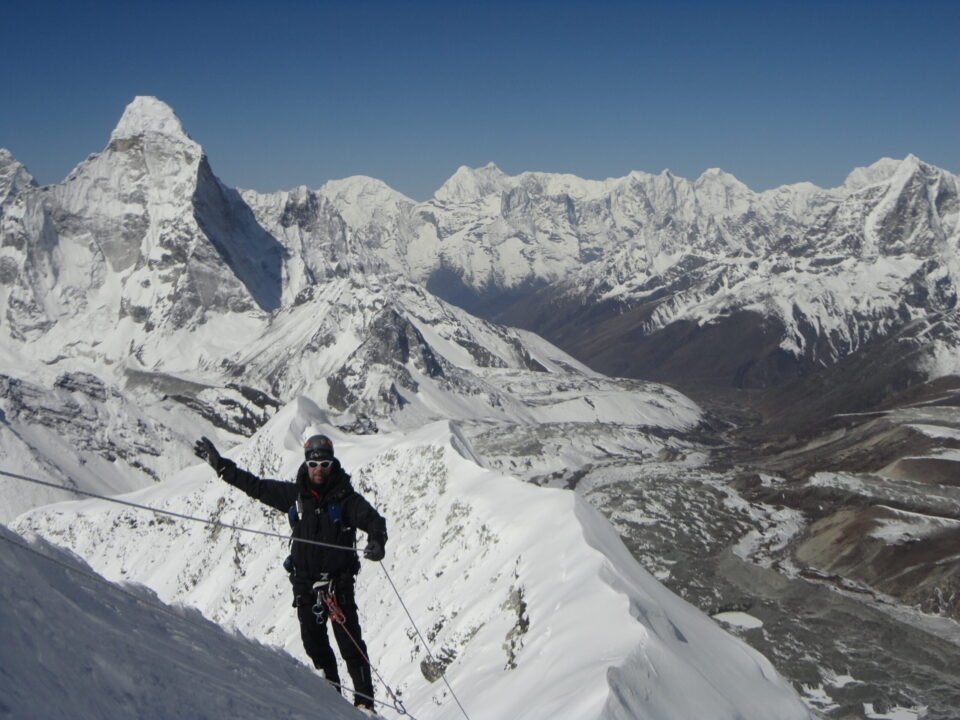
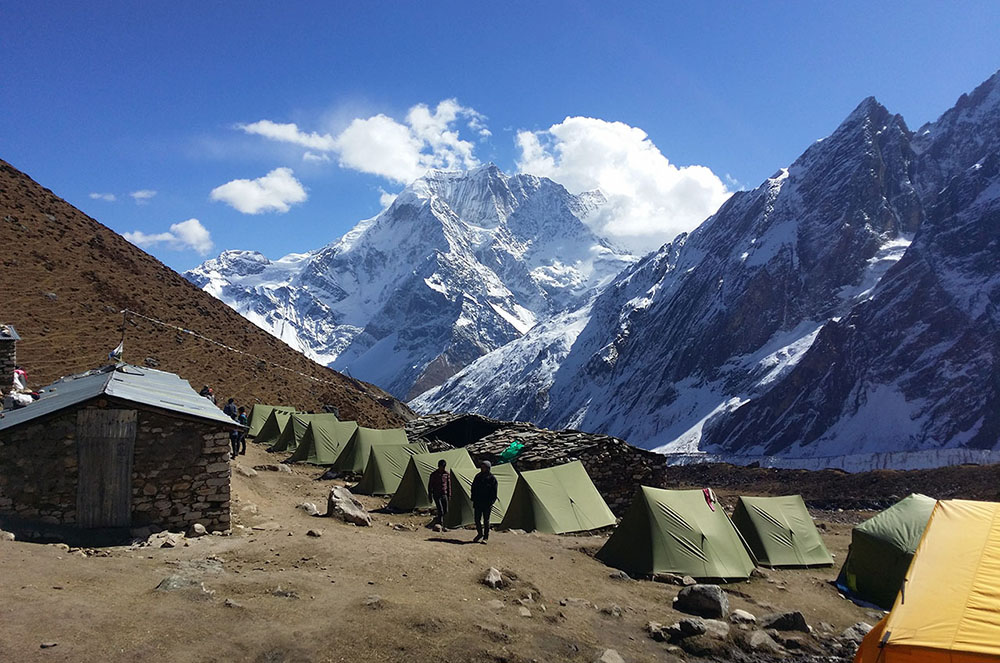
The Everest region’s Island Peak Trek is one of Nepal’s greatest trekking and peak climbing experiences. Enjoy the beautiful glimpse and rising mountain while trekking towards the Island peak base camp, which is topped at a high height of 6,160m above sea level. For beginner climbers and mountain lovers, this trip provides the best peak climbing experience. The Island Peak, also known as Imja Tse, rises like a beautiful rock and ice area surrounded by glaciers and peaks rising to 8,000 and 7,000 meters. The trek to the island peak’s base camp will take you over one of Nepal’s most attractive and challenging trekking trails in the Khumbu region.

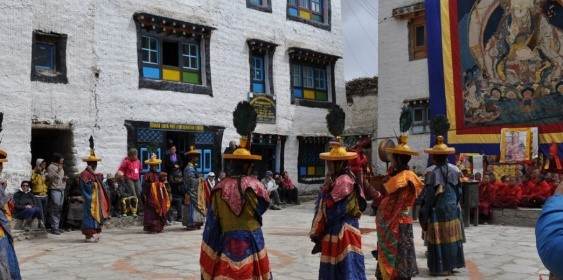
The trail to the Island Peak Base Camp passes past Sherpa communities and beautiful glacial landscapes. Stay in small teahouses maintained by Sherpa families and visit historic Buddhist monasteries. The views from the summit of this mountain are breathtaking, and the trip to the peak is made all the more unforgettable by the stunning airy ridge climb. Several skills in safe mountain travel at high altitudes, such as glacier trekking, climbing, and moving on mixed snow and ice terrain, will be taught and practiced during the trip. This trip requires good altitude abilities, and if you can’t master them before joining us, you’ll have plenty of time to study and practice them before reaching Island Peak.

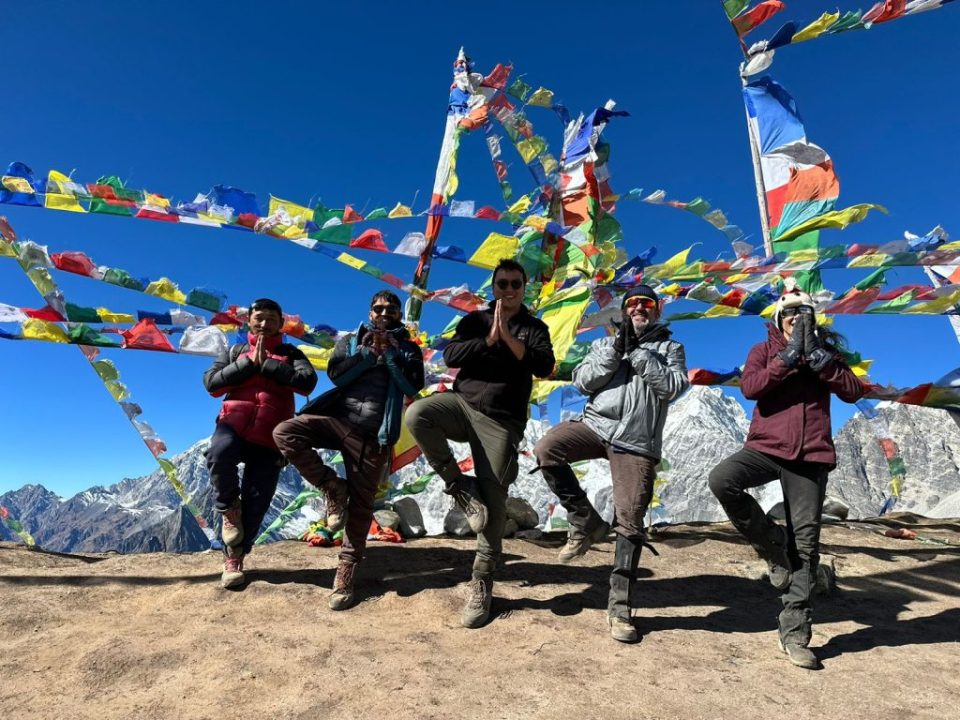
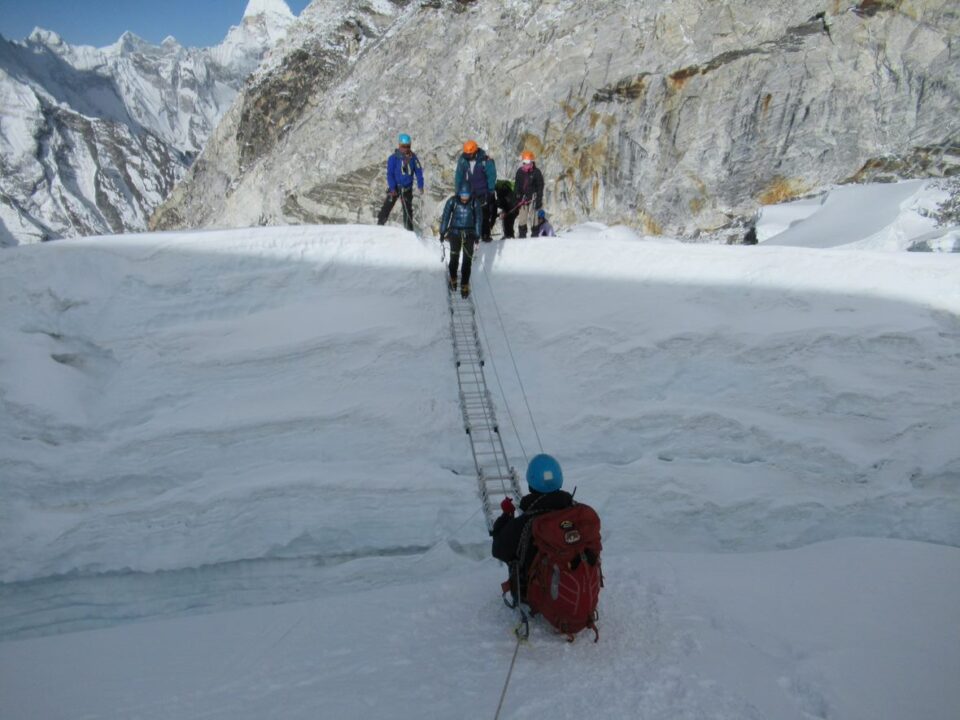
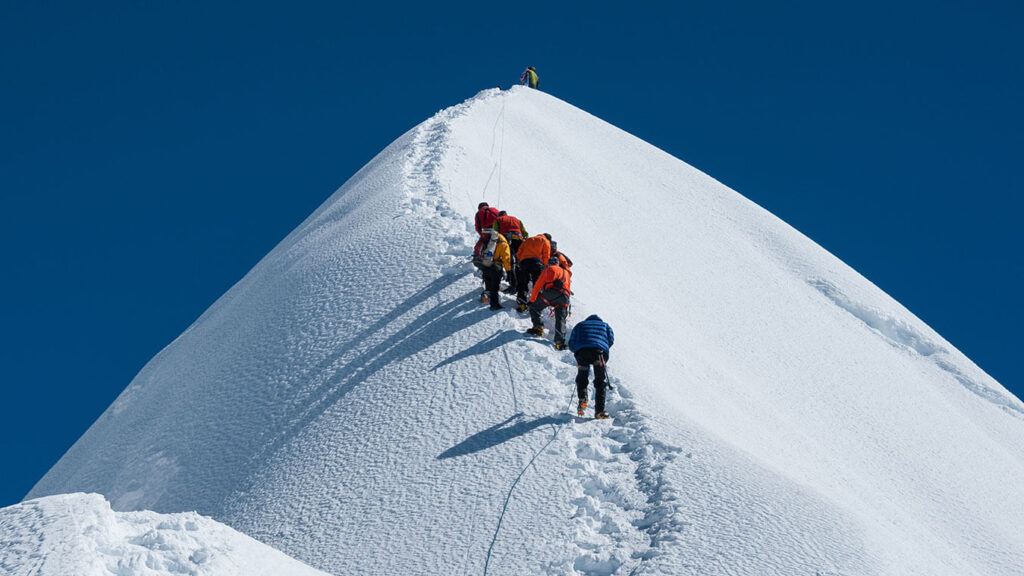
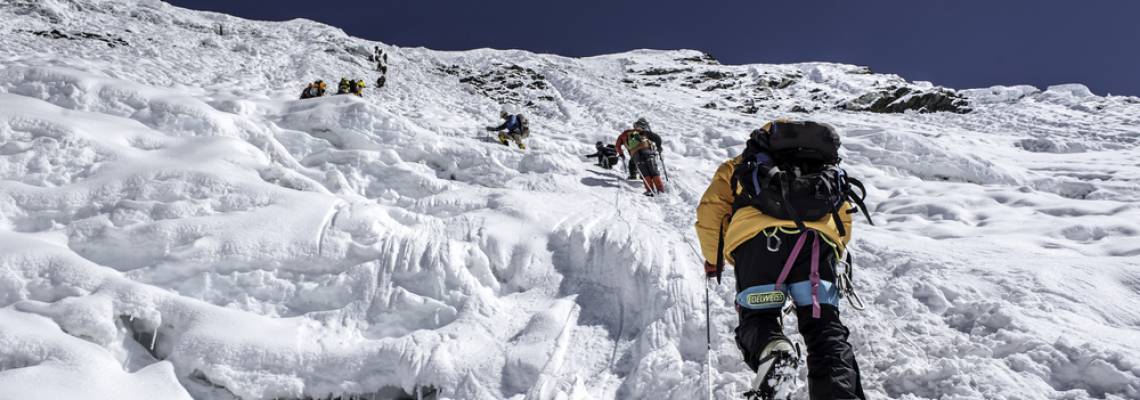
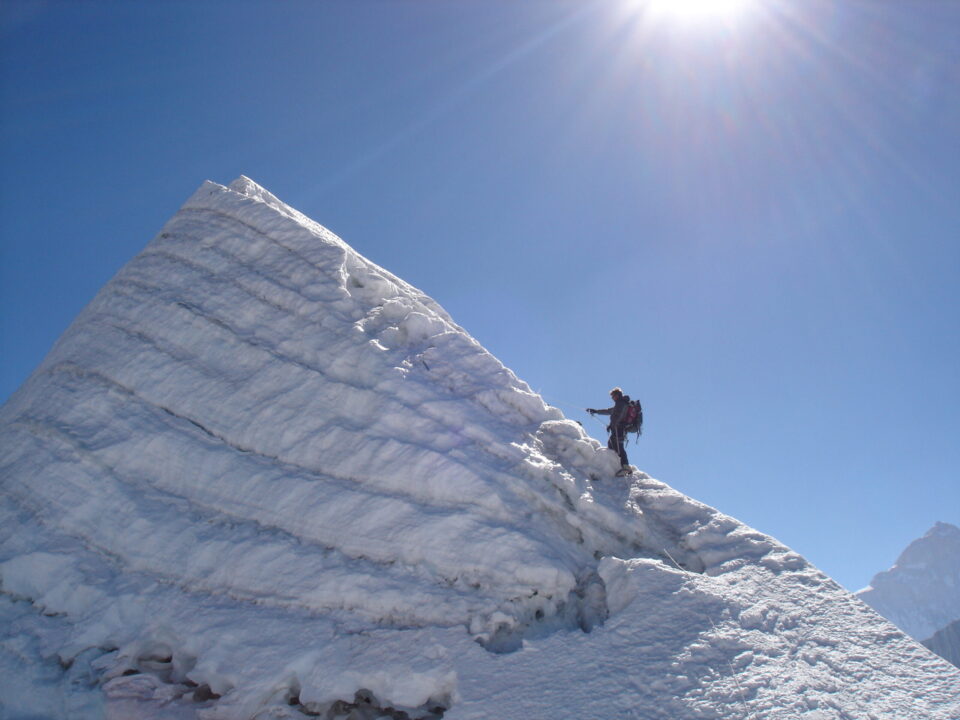
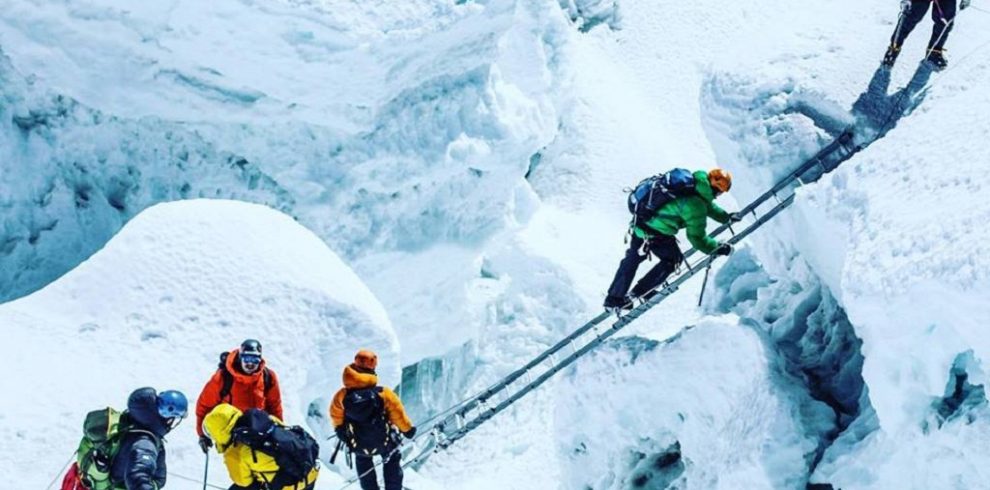
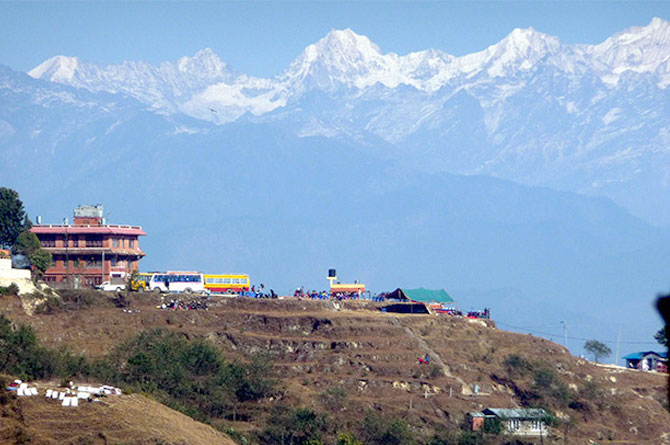
The approach route follows the Chukkung Valley to Base Camp, from where a hard 9 to 12 hours round trek to the summit, depending on weather, is required. The route includes winding rocky pathways and rushes to the snow line, followed by a section through the glacier and crevassed terrain in rope teams, and finally a 300-meter headwall to the summit. After traveling from Kathmandu to Lukla, trek to Namche Bazaar, the lively heartland of Sherpa culture, where you’ll need to acclimate for a few days. Continue to Tengboche, where you can seek blessings from the head lama, and then to Dingboche in the Imja Valley. Buddhist religious temples and prayer wheels can be seen throughout the trail. Beautiful and bright prayer flags are draped across the route’s metal bridges and trees. Tengboche Monastery, the most prominent Buddhist monastery in Khumbu, is visited. On the way to Namche Bazaar, take in the first view of Mount Everest.

Trip Facts 

Country  Nepal
Destination  Everest Region
Duration 16 Days
Accommodation Hotel, Lodge, Tea house, Camp
Activity Trekking and climbing
Meals  12 Dinners, 13 Breakfast, 10 Lunch
Maximum Altitude 6,189m/20,306ft
Attraction Tengboche Monastery, Island Peak, Namche Bazaar
Grade Challenging
Best season  Mar, Apr, May, Sept, Oct, Dec

Trip Highlights 

  • Island Peak, also known as Imja Tse in the Himalayas, is a great place to start climbing in the Himalayas.
  • A trek through the naturally unique Sagarmatha National Park with close-up views of 8000m, 7000m, and 6000m peaks.
  • In the Khumbu region’s towns, learn about traditional high-Himalayan Sherpa culture.
  • Personalize your Himalayan trekking and mountaineering adventure.
  • Get your first glimpses of the sunrise over the majestic mountains (Nuptse, Lhotse, Lhotse Shar, Makalu, Baruntse, Ama Dablam) as well as the stunning sunset.

 Is this trek appropriate for you?

  • This trek includes 14 days of strenuous climbing. You’ll be trekking for 5 to 6 hours per day, reaching elevations of over 6000 meters at times. We cannot overestimate the importance of being in excellent physical shape and health, which requires training prior to your trip to ensure that you are properly prepared.
  • If you’re looking for a challenging trekking and climbing trip, this is the trek for you. It is advised that you have prior high-altitude trekking experience.
  • The weather in the Himalayas can be unpredictable, and every year a large number of flights to or from Lukla are delayed or canceled because of weather conditions, so you should plan accordingly.
  • The teahouses, or trekking lodges, where we stay on the trek are very basic, with just basic services. Hot water may not be accessible at all times and may be charged extra, as will access to electrical outlets for charging electronics. Wi-Fi is available in some areas, although the quality of the connection may be poor.
  • The path twists and turns through challenging terrain. At 6,189 meters, you’ll reach the highest peak. Because of the weather, isolation, and high altitude of this walk, it’s critical to take it carefully and stay hydrated.

  Itinerary 

Days                                    Activities  Duration 
1. Arrival at TIA Kathmandu (1,350m/4,429ft)
2. Fly to Lukla and Trek to Phakding (2,800m/ 9,187ft) 3-4 hrs
3. Trek from Phakding to Namche Bazaar (3,438m/ 11,280ft) 5-6 hrs
4. Acclimatization Day at Namche Bazaar (3,438m/ 11,280ft)
5. Trek from Namche Bazaar to Tengboche (3,870m/ 12,697ft) 5-6 hrs
6. Trek from Tengboche to Dingboche (4,360m/ 14,305ft) 5-6 hrs
7. Trek from Dingboche to Chukkung (4,730m/ 15,519ft) 3-4 hrs
8. Acclimatization Day at Chukkung, climb Chukkung Ri and return back to Chukkung (5,546m/ 18,196ft) 3-4 hrs
9. Trek from Chukkung to Island Peak Base camp and Pre-Climb training at Island Peak Base Camp (5,200m/ 17,061) 3-4 hrs
10. Climb Island Peak Base Camp to Island Peak Summit and back to the base camp (6,189m/20,306ft) 10-12 hrs
11. Contingency Day
12. Trek from Island Peak Base Camp to Pangboche (3,985m/13,075ft 5-6 hrs
13. Trek from Pangboche to Namche Bazaar (3,438m/11,280ft) 4-5 hrs
14. Trek from Namche Bazaar to Lukla (2,800m/9,187ft) 6-7 hrs
15. Fly from Lukla to Kathmandu (1,350m/4,429ft) 30 mins
16. Final Departure


Day To Day Itinerary

  • Departure from : Kathmandu, Nepal
  • Arrival On : Kathmandu, Nepal

Day 1

When you arrive at TIA Kathmandu, you will be greeted by a friendly face. Our representative will meet you at the airport and drive you to your hotel. Arrive at the hotel and finish the check-in process. In the evening, our guide will meet you and give you a quick overview of the adventure. The hotel will be our home for dinner and the night.

Day 2

After breakfast. Check out of the hotel and make your way to TIA to catch your flight to Lukla. Lukla is only approximately a 30-minute flight from Kathmandu. The fly offers spectacular views of Everest and its surroundings. Our climb to Everest Base Camp will begin after we arrive in Lukla. We will trek for around 3-4 hours through the breathtaking beauty of the Khumbu valley, smelling of cherry blossoms and rhododendrons. Dinner and overnight stay at the lodge.

Day 3

After breakfast, we will trek for about 4-5 hours to Namche Bazaar. It takes 2 hours to walk from Phakding, and we’ll need to get our Sagarmatha National Park permits first because we’ll be visiting a UNESCO world heritage site, Sagarmatha National Park. After that, it takes 3 hours to get from Monjo to Namche Bazaar. When you arrive in Namche Bazaar. Make your way to the hotel. Staying at the hotel for dinner and the night.

Day 4

We’ll rest at Namche Bazaar today to help our bodies adjust to the altitude and avoid altitude sickness on our next trek, as we’ll be moving to a higher altitude the next day. In the morning, have breakfast and tour the Namche Bazaar. You can go for a morning hike to the hill above Namche to obtain a view of Everest and enjoy the beautiful alpine scenery as the sun shines. Dinner and Overnight stay at Namche.

Day 5

After a hearty breakfast, we’ll depart for Tengboche. The view of Mt. Ama Dablam, Thamserku, and Kangtega, as well as Mt. Everest and the river valley below, is breathtaking. We’ll have lunch at Phunke Tenga after a 3–4-hour stroll. After lunch, we’ll continue trekking through the pine forest for another 2-3 hours to reach Tengboche Monastery. Some Himalayan Tahr and Himal can be found along the path. Dinner and overnight at quite a monastic village of Tengboche.

Day 6

We will trek to Dingboche today. After breakfast, we will trek into the woods through the town of Pangboche. We will arrive in Syomare after a 3-hour walk, where we will have lunch. After recharging our batteries, we continue on to Dingboche for another 3-4 hours. Dingboche for dinner and the night.

Day 7

After having a delicious breakfast Continue to Chukkung. Even though it is only a short distance between Dingboche and Chukkung, you can feel the altitude. Along the way, take in breathtaking views of Island Peak, Lhotse, Chukkung Ri, and Makalu. When you get to the settlement, find a teahouse and eat your lunch there. Explore the region surrounding the settlement or relax on the terrace of your lodge and take in the view of the mountains. You will be walking for 3-4 hours. Dinner and Overnight stay at the Lodge. 

Day 8

Trek to Chukkung Ri, a hill near the village, to help your body adjust to the thin air. Chukkung Ri, which rises to a height of 5550 meters, is an excellent hill for an acclimatization climb. You can see Island Peak, Lhotse, Ama Dablam, and other summits if the weather is clear. You won’t need any technical climbing skills, and you’ll be able to hike up and down without difficulty. After returning to the lodge, the final equipment and gear check will take place. If you have trekked without your own climbing gear, you can visit the mountaineering rental gear business and rent a few items.

Day 9

You trek from Chukkung to the Island Peak Base Camp. The trail passes via the Lhotse and Imja glaciers and is an uphill trek. The scenery is raw and beautiful. You arrive at the Island Peak Base Camp after a short climb, where you will begin your summit push. By the time you arrive at base camp, tents will already be set up. A one-person tent will be your sleeping arrangement. After lunch, leave your belongings at your tent and attend a pre-climb training session. Under the cautious eye of your guide, you will be able to perfect your rappelling and belaying skills. He’ll also show you how to use a karabiner, ascender, ice ax, harness, and other climbing tools. Get a good night’s sleep because you’ll need to get up about midnight tomorrow to prepare for your peak attempt. Overnight in Base Camp at tented camp.

Day 10

To avoid the clouds and strong breezes that arrive late in the afternoon, the team must be on the slopes climbing as early as possible. The climb is hard and difficult, requiring the use of belay equipment. You should bring a packed lunch and some snacks with you because you will be climbing for the majority of the day. After a short hike, you will arrive at High Camp. It takes around 3 hours to hike from here to Crampon Point when you put on your crampons as the trail becomes ice and slippery. From 5700m onwards, man-ropes will be secured for the team’s safety. Reach the base of Imja Glacier by following a narrow ridge. Enjoy a stunning sunlight panorama of Makalu, Baruntse, and Ama Dablam, from the glacier. Overnight in Base Camp at tented camp.

Day 11

An additional day in case severe weather prevents you from summiting on time. This day can also be used in the event of an emergency, such as canceled or missed flights, delays due to minor injuries or weather conditions, and so on. If you keep to your timetable and everything goes according to plan, you can spend the extra day exploring a Sherpa village along the way.

Day 12

From Island Peak Base Camp, it’s a hike to Pangboche, one of the Everest region’s oldest and highest permanent Sherpa communities. The town is home to the Khumbu Region’s oldest Buddhist Gompa monastery. Dinner Overnight in Pangboche at Teahouse.

Day 13

You’ll leave Pangboche today and travel to Namche Bazaar. You can enjoy the basic amenities you’ve been lacking for the past few days in Namche a hot shower, nice coffee, baked goods, delectable dinners, and so on. Allow yourself to be pampered to your heart’s content and have a restful night’s sleep.

Day 14

After breakfast, we will walk through the same trail to reach Lukla. Have a get-together with the local crew in the evening to celebrate the end of your Everest trip. Dinner and overnight at the lodge. 

Day 15

Following breakfast. Return to Kathmandu by checking out of the lodge.

Our agent will meet you at the airport and transport you to the hotel. Make your way to the hotel. you are free for the rest of the day. You may take a walk in Kathmandu’s valley and a night stroll through Thamel. Dinner and overnight at the lodge. 

Day 16

Our agent will drive you to the international airport of Kathmandu 3 hours earlier than your flight time, as per your travel itinerary, and your tour will end here.

Tailor Your Holiday


Route Map

image

Altitude Map

image

What's Included

  • Arrival & Departure: Airport – Hotel transfer – Airport (Pick Up and Drop).
  • Hotel Accommodation in Kathmandu: 2nights at Star categories hotel on a twin sharing and BB basis.
  • Welcome Dinner and farewell dinner at Nepali culture restaurant in Kathmandu.
  • Food & Lodging: 3 meals a day (Breakfast, Lunch, Dinner) along with accessible accommodation sharing at Hotel/Lodge/Teahouse/Camp during the trek.
  • All government and local taxes if necessary.
  • Permit: All necessary paper works: Sagarmatha National Park permit, Khumbu Rural Municipality entry fee, and NMA Island Peak Climbing Permit.
  • Trekking Map.
  • Member transportation: – Air Transportation: (Domestic Flight) Fly from Kathmandu – Lukla and while returning Lukla.
  • Drinking water: 2 liters of boiled water to carry on thermos per day per member.
  • Guide: Government licensed Guide (English speaking) during the trek.
  • Porter: Porters (2 trekkers: 1 porter) up to 15kg during the trek.
  • Insurance: Insurance for all involved Nepalese staff during the trek.
  • Comprehensive Medical kit.

What's Not Included

  • Air Fare: International flight airfare (from and to Kathmandu).
  • Nepal entry visa fee.
  • Extra night in Kathmandu: Extra nights’ expenses in Kathmandu. In case of early arrival or late departure, early return from Trekking (due to any reason) than the scheduled itinerary.
  • Personal Insurance: Travel and high-altitude insurance. *Mandatory
  • Personal Expenses: Telephone calls, Internet, Toiletries, battery recharge, hot shower, laundry, soft drinks, beer, and any alcoholic beverages.
  • Personal Equipment: Clothing, Packing Items or Bags, Personal Medical Kit, Personal Trekking equipment.
  • Rescue Evacuation: Medical and emergency rescue evacuation costs if required. (Rescue, Repatriation, Helicopter, Medication, Medical Tests and Hospitalization costs).

Equipment List

What to bring ?
General

Tailor Your Holiday

Everyone has their own preferences in terms of destination, journey time, and budget. As a result, sticking to our plan isn't necessary. We will create a personalized itinerary for you that includes accommodations, transportation, meals, and tour guides. We guarantee you the best Tailor-made Package because this is your trip. You have the option to personalize it, as your liking. Let us Plan together to make your Vacation worth it.


Fixed Departure

Fix departure coming soon

Why Travel With Us?

Secure Online Payment, No Credit Card Fee

Travel with Locals. Support Locals

Lifetime Deposit

Private & Tailor-Made Trips

24/7 International Support

Support Local Communities & Donate to Charity

All Inclusive Price

Secure Online Payment, No Credit Card Fee


The ideal season to travel

January: 

Nepal’s trekking off-season is in full effect in January, with low tourist numbers across the nation. The spectacular views and the fact that you’ll have the trails to yourself make this a surprisingly fantastic time to trek to Island Peak if you’re prepared for chilly temperatures.

February: 

While much of Nepal remains freezing in early February, the temperature begins to rise later in the month. The mountains are still cold, and there will be snow, but winter is coming to an end. The average February temperature in Namche Bazaar (11,290 feet/3440 meters) is 43°F (6°C), which isn’t too cold but certainly not warm. Since winter is the off-season, finding a bed in the teahouses that are open throughout the Everest region should be simple.

March:

March marks the start of spring, one of Nepal’s two high seasons. While temperatures in the mountains will likely remain chilly, and snow will likely remain in certain areas, pathways will begin to soften. In March, trekkers returned in greater numbers, and there are numerous reasons for this. While March isn’t as crowded as April, the normal Everest Base Camp (EBC) route soon overflows during this season.

April: 

April, as of March, is a popular trekking month in Nepal. The monsoon rains are still some weeks away, and temperatures are normally pleasant or at least not too chilly in the high Himalayas. In April, temperatures in the Himalayas are still cooler: 34°F (1°C) to 53°F (12°C) in Namche Bazaar (11,290 feet/3440 meters), an important destination on the EBC climb. At higher elevations, temperatures will be cooler.

May:

May marks the beginning of the Everest climbing season, as weather conditions on the mountain are most ideal at this time of year, although these conditions are very different from what normal trekkers will find at lower altitudes. Although the number of trekkers in Nepal decreases in May as humidity and temperatures rise in preparation for the monsoon season, the trail to Island peak is an exception.

June: 

By mid-June, monsoon rains had arrived, and most trekkers had left the paths. The conclusion of the Everest-climbing season normally occurs in the first half of the month. However, even once the rains begin, it hardly ever rains all day every day, so if you’re prepared for rainy weather and understand that humidity and rain clouds may hamper your views, June isn’t a bad month to trek in the Everest Region. Furthermore, the higher you climb in height, the less probable it is that it will rain.

July:
In July, Nepal’s high rainfall keeps most trekkers off the trails. However, individuals who are well-prepared with good rain gear and are willing to accept some potential travel delays can still enjoy their climb to Island Peak. In July, the temperature in Namche Bazaar is pleasant, with an average high of 60°F (16°C). The further you travel into the mountains, the cooler it gets and the less rain you get, however, it will almost surely pour at lower elevations. There’s also a danger of mudslides and landslides disrupting hiking trails.

August:

The monsoon season in Nepal begins in mid-June and lasts until mid-September. In July and August, the Everest Region, like the rest of the country, receives the most yearly rainfall. It also has the hottest temperatures; while the high Himalaya is never ‘hot,’ normal highs in August in Namche Bazaar are around 60°F (16°C).

The higher you go into the mountains, the cooler it gets and the less rain there is. In August, there’s also a danger that landslides would close hiking routes and make paths muddy.

September:

By mid-to-late September, the monsoon rains will have passed, and the weather will be suitable for trekking in Nepal once more. Despite the fact that excessive humidity may hide some mountain views, there’s still a possibility to see amazing views early in the morning. In addition, in September, the popular Everest region trek is less crowded than later in the autumn season.

October:

The month of October is the busiest for trekkers in Nepal. The weather is quite stable, with a clean, rain-free sky providing superb mountain views. However, crowds are at an all-time high, with the Everest region Trek being the most popular in the country. When visiting the Everest region in October, it is critical to plan properly far ahead as possible.

November:

In November, there is extremely little possibility of rain in the Everest region—it is the driest month of the year. This means that humidity is at an all-time low, and the chances of seeing clear mountain views are greater than at any other time of year. Temperatures are a few degrees lower than they were in October, with a low of 26°F (-3°C) in Namche Bazaar (11,290 feet/3440 meters) with a high of 48°F (9°C) on average. Temperatures will be even cooler at higher elevations. However, given the low chance of rain and clear skies, November is the greatest month of the year to hike to Everest in terms of weather.

December: 

As winter approaches, the trekking trails become empty except for the most courageous adventurers. However, if you’re properly equipped for cold temperatures, December is a great season to walk to Island Peak.  The weather in December isn’t quite as freezing as it is in January, but the difference isn’t significant. This month, the average high in Namche Bazaar is 44°F (7°C), while the average low is 21°F (-6°C). Because Namche is only 11,290 feet (3,440 meters) above sea level, temperatures will be much cooler higher up.


Flight to Lukla

  • Almost every trip begins with a flight from Kathmandu to Tenzing Hillary Airport in Lukla, a small single-landing runway airport high in the Himalayas. As it is the easiest way for your trek to Island peak.
  • Lukla Airport is also known as the most dangerous airport in the world. This airport, which is only open when the weather is calm and visibility is excellent.
  • It’s impossible to say whether or not your Lukla flight will be canceled. If this occurs, your trip may be extended by one or two days. So, plan ahead and add days to your itinerary to ensure you don’t miss your international flight.
  • Flights to and from Lukla are currently operated from Manthali Airport in Ramechhap rush hours at Kathmandu Airport during the high season (spring and autumn). Kathmandu is 132 kilometers (4 hours and 30 minutes) away.
  • Helicopters have a little more flexibility when it comes to arriving at Lukla, and can frequently make the flight in weather or visibility that a small plane would not be able to make. It is sometimes doable to switch your flight to a helicopter, but this can be expensive and there is no guarantee that you will arrive on time.

Altitude sickness

Altitude sickness is a sneaky monster that may attack even the fittest trekkers. This demands doing everything in your power to prepare for altitude trekking and taking things carefully throughout your journey to Island Peak. With increasing altitude, the amount of available oxygen decreases, which is the primary cause of high-altitude sickness. Island Peak is located at an elevation of over 5,000 meters above sea level, where the atmosphere is depleted of oxygen, making breathing difficult.

The Island Peak climbing is a high-altitude journey that needs proper acclimatization. Your body requires time to adjust to thin air, so start at a lower altitude and work your way up. Some of the symptoms of Altitude sickness are:

Early symptoms of altitude sickness

  • Increased breathing.
  • Increased urination.
  • Headache and Restless sleep.
  • Periodic breathing at night as a result of altitude.

Later symptoms

  • Shortness of breath.
  • Extreme fatigue.
  • Respiratory failure.
  • Cerebral edema.

Certain care should be made to ensure that the situation does not worsen. However, if the symptoms worsen, you may need to return to a lower height and seek medical help. There are, however, a number of other precautions you may take while trekking to lessen your risk of altitude sickness.

  • Trekkers can change their bodies by slowly and gradually climbing, as our bodies require time to adjust to the oxygen level. At least one day of acclimatization rest is required for high altitude trekking, and you should go as high as possible before returning to a lower height for the night.
  • You should do various strength training exercises such as running, cycling, jogging, push-ups, and going to the gym to acquire strength and stamina for your adventure.
  • As the air gets increasingly thin, an increase in elevation reduces oxygen levels, and in the Everest region trek, an increase in altitude also means less vegetation. The consumption of alcoholic beverages, cigarettes, and tobacco decreases the body’s water content.
  • The greatest remedy is to stay hydrated at all times. On your walk, instead of drinking cooled water, drink warm water.
  • Diamox is the most effective altitude sickness medication; thus, you should bring a subscription with you on the trek. However, you should consult with your physician to see whether it is advantageous.

Things to know before trekking to Island Peak.

Drinking-Water

Especially for trekkers, it is very necessary to hydrate your body at a higher altitude than in lower elevations to avoid dehydration and altitude sickness. Lack of fluid can be the main hindrance during this peak climbing journey. You should hydrate your body with at least 3-4 liters of water on a daily basis (Tea, soup, or normal drinking water).

Throughout the journey, you will come across many taps and river water resources but is not safe to drink without purifying them. Besides this, the only other place to find drinking water is lodges and teahouses. You can buy the plastic bottle water in the teahouses but get expensive as you climb to the higher altitude, and it pollutes the local ecosystem.

Every day, carry enough water for the day before beginning the trek. In and beyond the base camp there are no water resources. So that, from the base camp you have to melt the snow for water and treat it to make it drinkable. But not to worry, if you are traveling from any agency like us, you’ll be provided hot water 2-3 liter per day. Here, we recommend you use a Reusable water bottle or water pouch favorable for both hot and cold water.

During this journey, you may have to pay from 1$ to 4$ for a sealed bottle of water. Here are some ways that you can use to make the water drinkable.

  1. Boiled water

Boiling water is the best way to purify the water. As we are climbing to a higher altitude you need to boil the water for about 3-minute and season it with a pinch of salt before drinking. You can get free cold water in the teahouse but for boiled water, it cost around 1-2$ per liter and 3$- 5$ for a large pot.

  1. Purification tablets or electrolyte powder.

Purification tablets like chlorine or iodine tablets are commonly used tablets by trekkers to disinfect the water. 1 tablet is enough for a liter of water. It takes around 30 min for the tablets to dissolve and become drinkable. Water, purified by tablets may leave a taste in your mouth.

Electrolyte powder is another option. Electrolyte powder is a better way to purify water than tablets because electrolyte powder contains minerals such as salt, Potassium, Magnesium, which are important for your body during the trek.

  1. UV Light water purifier/ SteriPEN.

It is a simple, effective, economic, and environment-friendly way to purify water. It kills the bacteria and virus within 10 sec by exposing them to ultraviolet light using Steripen, without changing the flavor of the water. This is a highly recommended method of purifying water (one-time investment).


Electricity and Internet facility at Everest region.

Electricity facility.

Despite the challenging geography and weather conditions, the Everest region has been able to provide electricity and access to the Internet.

The lower Everest region (Lukla, Phakding, Namche, Pangboche) is hydroelectrically powered, thus you can enjoy free electricity and internet service but as you climb up to the higher part of Everest Region, the people rely on solar power electricity so there will be no charging socket in your room. There is a commonplace for charging usually in the dining area, and you will be charged extra for charging on different bases and voltages of your device.

Charging a mobile phone cost 1.5$- 5$ per hour (from Dingboche onward)

Internet Facility and Service

Internet and network facility is needed to contact your family, friends, employee, to post updates and upload photos during the trek.

Everest link has been providing an internet facility throughout the Everest region.

You can purchase an Everest Link WI-FI card at the lodges/teahouse/guesthouses and use the Everest Link hotspots to connect to the internet anywhere on the path within Everest Region.

Cost of Everest Link WI-FI card:

-10GB= NRP 2000/ 17$

-20GB= NRP 3000/ 25$

(Valid for 30 days)

NCell and NTC cellular service has been providing the network and internet facilities in Everest Region. You can buy the NCell or NTC sim card from the stores either in Kathmandu for 1$ or in Lukla and Namche Bazaar for 3$-4$. By taking data packages you can use the internet from NCell and NTC up to Tengboche. NTC network service is also available in the Island Peak Base camp.

NTC cellular service is most preferred over NCell because it provides good service and signals connectivity throughout the Everest region, in comparison to NCell.

Buy NTC data package

Dial*1415#

Cost of data package in NTC:

-14GB=7$

(Valid up to 28days

-30GB=15$

(Valid up to 90 days)

Check balance

Dial *1415#

Buy NCell data package

Dial *17123# and select.

Cost of data package in NCell:

-15GB=10$

-25GB= 12$

(Valid up to 30 days)

Check balance

Dial*101#


Document needed to buy a sim card.

For foreigner = 1 passport size photo, Passport photocopy, or valid identity card.

For Nepali = 1 Passport size Photo, Photocopy of Citizenship.

Some useful tips to reduce the use of electricity.

  • Extra batteries for the camera.
  • Power bank with 5000-10000mAh.
  • The solar charger and solar lamp (LuminAID Lamp).
  • If possible less usage of a device with low brightness, GPS, and WI-FI off.

Essential Backpack items for Island Peak Climbing.

The bag of a trekker also reveals their climbing level of experience. A good trekker should be a smart backpacker. You should be pre-prepared for the things that you need in the journey.

Here are some of the things that you need to take with you for the journey.

Travel documents

  • Airline tickets with the itinerary.
  • Travel insurance policy documents.
  • Valid passport.
  • Copies of passport.
  • Passport-sized photos.
  • Nepalese cash.
  • Travel permits.

Clothing

  • A pair of waterproof trekking shoes or hiking boots.
  • A pair of flip flop slippers or running shoes.
  • A pair of mountaineering boots for climbing.
  • 2-3 sets of thermals (leggings and tops)
  • 4-5 pairs of hiking long sleeve shirts or tops.
  • Pairs of trekking shorts and down pants.
  • Fleece jumpers or a set of tracksuits.
  • Good quality windproof down jacket.
  • Lightweight waterproof jacket with large hood and pants.
  • Insulated hardshell jacket.
  • Neck gaiter, leg warmer, and packet of pocket hand warmers.
  • 5-6 pairs of quick-dry wool socks/liner socks, underwear, sports bra.
  • Pair of inner and outer gloves.
  • Knitted Hat, sun cap, beanie, or bandana.
  • Glacier Sunglasses/ eyeshade for trekking and Full coverage eyewear for climbing (Eye and nose).

Trekking equipment

  • Waterproof trekking bag of 40-50liter and Rucksack of duffel bag (if your backpack is not enough for all your item and need a potter).
  • Reusable water bottle (both hot and cold) of at least 2-2.5litre.
  • A sleeping bag and sleeping bag liner.
  • Trekking stick/ poles.
  • Pair of ice crampons (If trekking in winter).
  • Route map to Island Peak (Everest Region).
  • LED Headtorch or solar lamp (LuminAID lamp).
  • Stuff sacks, plastic bags.
  • Plug adapter, Charging appliances, power bank, batteries.
  • Pocket knife.
  • Travel Wallet.

Peak Climbing equipment

  • Ice Axe.
  • Pair of ice/mountaineering crampons.
  • Screw gate Carabiners (2lock, 2 unlock).
  • Ascender (jumar)and Descender (figure of 8).
  • Plastic mountaineering boots.
  • Snow bar.
  • Climbing Rope.
  • Ice hammer.
  • Ice screw.

Toiletries

  • Rolls of Toilet paper, wet wipes, and tissue.
  • Medium-sized quick-drying towel.
  • Toothbrush and toothpaste.
  • Hand sanitizer.
  • Sunscreen, lip balm, body lotions.
  • Portable mirror.
  • Shampoo and soap.

Personal First Aid Kit

  • Antibiotics
  • Painkillers, Paracetamol, ibuprofen, aspirin, Nicole
  • Sanitary pads
  • Anti-inflammatory spray.
  • Anti-Nausea tablets.
  • Anti-diarrhea pills or power.
  • Altitude sickness tablets.
  • Water purifying tablets or electrolyte powder.
  • Mosquito and Insect Repellent.
  • Salt or anti-leech oil (If traveling in the rainy season, July- Aug)
  • Earplugs

You can buy or hire trekking/climbing clothes and equipment in Kathmandu. If you are buying it, you have to allow an extra day for shopping; however, if you are hiring it, you must inform us in advance so that we can arrange it before your arrival in Kathmandu. This way you can reduce the weight of your luggage and save time and money.

Branded trekking/climbing clothes and equipment are available around the Thamel area at a reasonable price.

Note Kathmandu- Lukla flight has a luggage allowance of 15 – 20 kg per person. For extra baggage, they charge 2$ – 3$ per kg. So, you can wear your trekking boots and jacket to reduce the weight. Have a hand carry bag for your passport, money, medicine, and pair of clothing. You can leave some unnecessary items in the hotel in Kathmandu also.


Accommodation, Meal, and Transportation

Accommodation

We will accommodate in star hotel during our stay in Kathmandu. In Lukla, Namche Bazaar, and Tengboche we will stay in lodges. For the rest of the stop, we stay at teahouses or camp.

Meal

During the trek, we will provide you three-time meals. You can choose from the given menu.

Breakfast– French toast, Cornflakes, Cereal, Pancakes, Bread butter, Roti- Tarkari, Eggs, Oatmeal, Porridge, Tea, etc.

Lunch– Dal Bhat (Rice, vegetable curry, meat curry, Lentils, Tomato Chutney, Salad, Papad) Vegetable noodle soup, Chicken noodles soup, Garlic soup, Broths, Fried noodles, Fried rice, Thukpa, Fried potato, Mo: Mo, etc.

Dinner– Dal Bhat (Rice, vegetable curry, meat curry, Lentils, Tomato Chutney, Salad, Papad) Vegetable noodle soup, Chicken noodles soup, Garlic soup, Broths, Fried noodles, Fried rice, Thukpa, Fried potato, Mo: Mo, etc.

Besides these, there are a variety of other options of food. You can buy from your own pocket.

Transportation

By Bus- From Kathmandu airport to hotel at Kathmandu and vice-versa.

By Air- Flight to Nepal. Flight from Kathmandu to Lukla and back.


Guide and Staff Arrangements

Throughout the trek, all your activities will be handled by our well-qualified and professional staff. We will do all the escorting. We are providing you with a highly experienced and licensed local Sherpa guide with fluent English speaking and has excellent communication skills. We will accompany you from Kathmandu and guide you throughout your Island peak climbing journey. Each group of 4-5 trekkers will be assigned an assistant guide, as well as a porter for two trekkers (2*15kg =30kg). If your luggage weighs more than 15kg you will be provided a porter individually but you will be charged for 2 people.

All our lead guides, assistant guides, and potters are well professional and experienced. So, we hope for your respect and cooperation with us throughout the trek.


A typical day on the Island Peak trek.

Every day will begin with the ringing of your alarm clock at 6 a.m. and a knock on your door from your guide with the invitation of breakfast. Get up, have breakfast, pack your backpack and get ready to start your day’s walk by 7 a.m. You need to start your trek early to avoid the scorching sun and to reach your overnight destination on time/ before dawn.  

You’ll walk on the rocky trail enjoying the scenery of glacial landscapes mixed with snow and crevassed terrain, clicking photos, creating memories, interacting with your guide, hearing each other’s stories. Lunch will be served at a local teahouse in the late afternoon (1-2 am). Having a flavorful lunch and an hour of rest, we will proceed to the overnight destination as per the itinerary. 

On arrival at the destination, check into your accommodation. Get freshen up and some rest. As every lodges/teahouse/guesthouse/camp where we stay has a common dining area with a wood-burning stove in the center, there you will get to meet other travelers. You can sit there, laugh at each other stories, play cards, sing songs, play music, and have a good time. This will help you forget all the tiredness of the day. Later in the evening, you will have your dinner together. After dinner, your guide will give some short briefings about the next day’s trek regarding when you must get up, when we have to start our trek the next day, where we will stay the next day, how many hours we have to walk and so on.

You will walk for a minimum of 4hrs to maximum 12hrs during this trek in the day. During the acclimatization day, hike around the small peaks/viewpoints and prepare your body to deal with any difficult walk. Before climbing to the peak, you will be taught how to walk/how we have to move while climbing the peak. You have to study and practice well because your life/death and success depend upon your skill and endurance.  At night enjoy the view of sparkling stars floating in the clear sky above the freezing cold wind. The summit day will be the difficult day of the trek. You will climb in a stunning airy ridge of snow and ice terrain. But, the success of the summit and the panorama views of the gigantic mountains of Nuptse, Lhotse, Lhotse Shar, Makalu, Baruntse, Ama Dablam, from the top of the peak are stunning. Hike to Chukkung Ri, Imja Valley, Summit of Island Peak will be your lifetime memory. Every stop might in these 14 days journey to Island Peak summit, will give you unforgettable emotions. Your hard walk will be paid off on the successful summit of Island Peak with memories that last for a lifetime. 


Nepal Tourist Visa and permits details

Visa procedure.

To travel to Nepal, you’ll need a tourist visa that is valid for the period of your stay in Nepal. Better, if you have a tourist visa valid for at least 1 month because anything can happen during the trip, and staying in Nepal after your visa expires would result in you paying a penalty.  Apply for a visa at your nearest Embassy of Nepal or obtain an On-Arrival visa at immigration in Tribhuvan International Airport, Kathmandu. But it’s better to contact your nearest Nepalese Embassy.

Here are the documents that you need, to apply for the tourist visa.

  • The Tourist Visa Application Form for Nepal (Fully completed online and printed)
  • Original Passport with at least 2 blank pages and validity of at least 6 months.
  • Photocopies of your passport’s information page.
  • At least 2 recent passport-sized photos of yourself with white background.
  • Proof of accommodation in Nepal.
  • Valid travel and return flight tickets.
  • A bank statement from the last 3 months with a minimum closing balance of NPR2,00,000.
  • Receipt of the visa fee for Nepal.

Note: 15 days visa cost USD 30. Our journey is of 16 days, so apply for 30 days tourist visa that costs USD 50.

Entry permits and Requirements

The Entry Permits that you need for the trekking in the Everest region and climbing the Island Peak are;

Trekking permits  Foreign Nationals SAARC nationals Nepali Citizens
1 Khumbu Pasang Lhamu Rural Municipality Entrance Permit NPR 2,000 per person (for the first 4 weeks)

NPR 2,500 per person (beyond 4 weeks)

NPR 2,000 per person (for the first 4 weeks)

NPR 2,500 per person (beyond 4 weeks)

NPR 2,000 per person (for the first 4 weeks)

NPR 2,500 per person (beyond 4 weeks)

2 Sagarmatha National Park Permit NPR 3,000 per person per entry + 13% vat.

(Approx. 34$)

NPR 1,500 per person per entry +13% vat

(Approx. 15$)

NPR 100 per person per entry +13% vat

(Approx. 1$)

3. NMA Island Peak Climbing Permit Spring (Mar-May)-USD 250.

Autumn (Sep- Nov)- USD 125

Off-Season (Jun- Aug, Dec- Feb)- USD 70.

Spring (Mar-May)-USD 250.

Autumn (Sep- Nov)- USD 125

Off-Season (Jun- Aug, Dec- Feb)- USD 70.

Spring (Mar-May)-NPR 4,000.

Autumn (Sep- Nov)- NPR 2,000

Off-Season (Jun- Aug, Dec- Feb)- NPR 1,000.

Note- A Khumbu Rural Municipality Entrance permit must be obtained from the Rural Municipality desk at the Lukla checkpoint.

Permits for the Sagarmatha National Park can be obtained from the Nepal Tourism Board in Bhirkuti Mandap, Kathmandu, and from the Sagarmatha National Park entrance gate at Monjo. To save time, we recommend that you obtain a Sagarmatha National Park Permit in Kathmandu.

NMA Island Peak Climbing Permit has to be obtained from Nepal Mountaineering Association, Nagpokhari, Naxal, Kathmandu.

For more information about Trekking Permit here is the link.

(If you are traveling from a travel/trekking agency your agency will arrange all the Permits.)

Documents required to get the Trekking permit.

  • Complete the permit form with your passport details and tour details (Trekking area, Entry and Exit date, and point, Route of Trekking, Emergency contact information for Nepal and your Home country).
  • Passport size photos.
  • Original passport with a valid visa.
  • Photocopies of passport personal information page.
  • Photocopy of travel insurance (Rescue/Heli evacuation included).

For more information contact us.


Travel Insurance

Trekking in Nepal is not less than an adventure and occasionally dangerous activity, especially at high altitudes. Trekkers must have travel insurance before visiting Nepal for trekking.  During these 16 days journey to Island Peak you might come across some physical injury, illness, sudden accident during the trek and all the medical expenses and loss has to be borne by yourselves.

So, you need to have travel insurance that will cover all our risks up to the altitude of 6,189m (Island Peak Summit).

You need to choose an insurance policy that covers all of your possible risks from the start of your journey to your final destination. The following threats should be covered by your travel insurance:

  • Cancellation of Domestic and International flights.
  • Lost and stolen baggage and passport.
  • Hospital and Medical expenses (physical injury, Acute Mountain sickness, Altitude sickness, sudden accident)
  • Emergency rescue evacuation such as a helicopter.
  • All high-altitude trek dangers up to 6,500m.

You need to choose your travel insurance wisely so that, in the case of such an incident, your travel insurance will cover the costs.

You can get your travel insurance in either your home country or in Nepal.


Responsible Travel

Everest region is not only the gateway to Mount Everest but is also the homeland of Sherpa. Besides being called the mountainous region, the Everest region is also renowned for the Sherpa’s traditions, cultures, Tibetan culture, and Eco-friendly environment. All travelers should travel responsibly in these regions. Majority of People in the Everest region practice Buddhism and Tibetan culture. 

You have to respect the local people, their culture, religion and try to limit any harmful acts that will have an adverse impact on their local culture and environment. You can learn some greetings words to exchange greeting respectfully, for example, “Tashi Delek” which means Goodluck/Blessings. We expect you to dispose of the plastic garbage (food wrappers, plastic water bottles) properly. You might encounter many rare species (Lophophorus, Musk Deer, Himalayan Tahr, Blood Pleasant, Himalayan Monals, Martens, Tibetan Snowcock, Golden Eagle, and some others) during this journey, you rather not disturbed them. While visiting the monasteries you have to follow the monastery’s norms. Ask for permission before entering and to click photos in any monasteries. 

Your one small negligence can bring a huge impact on the future.

Your responsible travel will help Nepal achieve long-term sustainable tourism.

Island Peak Trek- 16 Days

[WPCR_INSERT]

Trip Reviews

Lorem ipsum dolor sit amet, consectetur adipisicing elit, sed do eiusmod tempor


Decide Before You Travel

Planning for the Best Vacation this Season?